
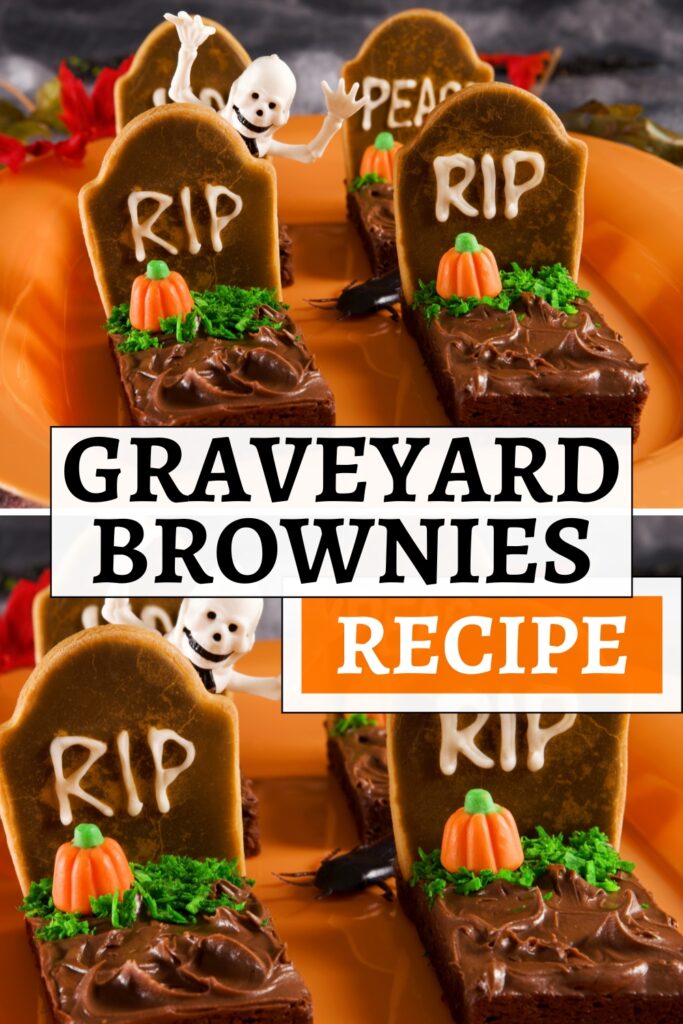
Graveyard Brownies Recipe – Easy and Fun Halloween Treats
When it comes to Halloween desserts, it doesn’t get more festive (or fun) than Graveyard Brownies. These spooky treats are a creative twist on classic brownies, topped with tombstone cookies, candy pumpkins, and green “grass” frosting. They look impressive on a Halloween dessert table but are surprisingly easy to make.
This recipe is also a great one to make with kids. They’ll love decorating the brownies with tombstones and candy, and you can even set up a “decorate your own graveyard brownie” station for a party or classroom event.
This blog post may contain affiliate links. This means that if you purchase an item through my affiliate link, I may receive a % of commission at no extra cost to you. This helps support me, my family and my blog to bring you great content for free!
Shopping List for Graveyard Brownies
Brownies:
- 1 box brownie mix (plus eggs, oil, and water as listed on the package)
Or make homemade brownies using:- ½ cup unsalted butter (melted)
- 1 cup granulated sugar
- 2 large eggs
- 1 teaspoon vanilla extract
- ⅓ cup cocoa powder
- ½ cup all-purpose flour
- ¼ teaspoon salt
- ¼ teaspoon baking powder
Toppings/Decorations:
- 1 tub chocolate frosting (or homemade)
- Oval or rectangular cookies (Milano, Biscoff, or sugar cookies work well)
- White icing or writing gel (for “RIP” or “Peace”)
- Green food coloring + shredded coconut or green sprinkles (for grass)
- Candy pumpkins
- Optional: Halloween figurines like skeletons or spiders for extra decoration
Below are links to my Amazon storefront where I share some of my must-have pieces for cooking in the classroom.
– USA Cooking Favorites
– UK Cooking Favourites
*These links are affiliate links. This means that if you click a link and make a purchase, I may earn a small commission at no extra cost to you. I only recommend products and resources I truly love and use. Thank you for supporting my work and my classroom!
Step-by-Step Graveyard Brownies Recipe
1. Bake the Brownies
- Preheat oven according to brownie recipe/box directions.
- Prepare brownie batter (either boxed or homemade).
- Pour into a greased 9×13-inch baking pan and bake until a toothpick comes out clean.
- Cool completely, then cut into rectangles or squares.
2. Prepare the Decorations
- Write “RIP” or other spooky sayings on the cookies using white icing. Let set.
- Tint shredded coconut with a few drops of green food coloring in a zip-top bag and shake until evenly coated (this makes “grass”).
3. Assemble the Graveyard Brownies
- Spread a layer of chocolate frosting over each brownie square.
- Press a decorated cookie into the top edge of each brownie to look like a tombstone.
- Add a candy pumpkin and a sprinkle of green coconut or sprinkles for grass.
- Place on a tray and add plastic skeletons, spiders, or bats for an extra spooky touch.
Tips & Variations
- Use edible markers instead of icing for easier tombstone writing.
- Swap candy pumpkins for gummy worms crawling out of the “dirt.”
- Make a large “graveyard tray” by leaving the brownies uncut, frosting the whole pan, and decorating with multiple tombstones.
- Try different cookie shapes for variety – rounded tops look especially like gravestones.
Graveyard Brownies are the perfect mix of spooky and sweet, making them a must-have for your Halloween spread. They’re simple to prepare, endlessly customizable, and a guaranteed hit with both kids and adults.
Whether you’re baking them for a party, school event, or just a fun family night at home, these brownies will add just the right amount of spooky charm to your celebration.
Helpful Links
If you found this blog post helpful, you may also be interested in;
- Chocolate Apple No-Bake Mummy Lollipops
- Halloween Candy Apples
- Frankenstein Cookie Recipe
- Pumpkin Rice Krispie Cakes
If you found this blog post helpful, please consider sharing it with your friends and colleagues on social media, it helps more teachers find support, and it means the world to me and my little family too.
And if you haven’t already, be sure to check out my Free Resource Library for tons of classroom tools, visuals, and printables to make your teaching life easier (and a whole lot more fun!).
P.S. Have you signed up for my VIP membership yet? If not, head on over and sign up now. You’ll get access to hundreds and hundreds of resources, templates, crafts and more being uploaded every month!
Nikki


One Comment