Zones of Regulation
One of the most popular systems taking place in classrooms right now is Zones of Regulation. It sounds great – but do you know what it is? And, if you’re a teacher, are you implementing it correctly? Read on to find out more about Zones of Regulation and the benefits of using it.
What is ‘Zones of Regulation’?
I recently overheard a teacher discussing ‘zones of regulation’ with a parent. She described it as a ‘behaviour management tool.’ I can see why she came to this conclusion, but honestly, it’s not a behaviour management tool. Zones of Regulation is actually a curriculum that is designed by Leah Kuypers. The curriculum is to help the individuals develop skills to help regulate themselves. Self-regulation is really important for our children, and the zones of regulation helps to promote this.
Now, the teacher who referred to it as a behaviour management tool – although wrong, she is partly right. The curriculum uses a cognitive behaviour approach. The activities help individuals to learn about each of the four zones, and to recognise when they are in one of those zones.
What are ‘Zones’?
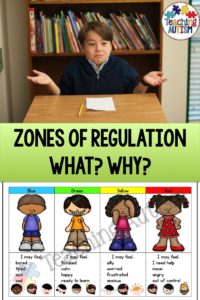
There are 4 zones included in the Zones of Regulation and each zone has it’s own colour. It’s very important that these colours remain the same – no changing them for ‘prettier’ colours! Each of the zones is based on a feeling/emotion/behaviour.
- The Red Zone
The red zone is for the most alert and intense feelings. This is to describe feeling angry, out of control, mean etc. - The Yellow Zone
The yellow zone is for when individuals feelings are heightened, but not to the extreme. This is to describe feeling silly, worried, frustrated, anxious etc. - The Green Zone
The green zone is probably the best zone to be in. This is when the individual is at their best for learning and interacting. The green zone is to describe feeling calm, happy, focused, ready to learn etc. - The Blue Zone
And finally, the blue zone. This is the least heightened of all the zones. This is generally used when the individual is feeling ‘down’ – hence the blue fits nicely here. The blue zone is to describe feeling bored, tired, sick, sad etc.
How does it work?
You can complete a variety of different activities to put the Zones of Regulation into practice. The activities will teach individuals the ways that they can recognise what zone they are in. It will also help them to self regulate and get themselves to that important green zone. We can also provide them with the tools they may need. Over time, we can pull back and allow them to seek those tools they need on their own.
What should I put in a ‘cool down’ box?
Think of your students and their sensory needs, although we try to include something for each sense in our boxes. Our students are pretty good at just tossing aside what won’t help them, and seeking out the item that they know will help them. Some examples are;
Touch – squeezy ball
Hear – musical instruments. We recorded calming songs on little buttons that the children love
See – liquid timer, my students always find these very relaxing
Taste – A lot of people don’t want to provide something edible for taste and that’s ok. We do try to avoid food in most places, and we often offer a chewy toy. This has always gone down well and can help reduce some tension for our students.
Smell – candles are a firm favourite for our students here.
We also like to include some extra bits that we know they like. Many of our students respond really well to social stories or picture books about different emotions. These are all great ways to let students know that it’s ok how they are feeling and how to work through it.
Benefits
What are the real benefits of the Zones of Regulation? There’s probably too many to list! A group of us brain stormed together and came up with the most important benefits that we have noticed since using Zones of Regulation;
- Our students were able to recognise what zones they were in. But, it also helped them to start to recognise what zones those around them are in.
- Many of our students can change mood quickly, and it’s not always easy for us to spot the reason why. But sometimes, us trying to find out why can actually make the situation worse. The zones of regulation has allowed our students to recognise their own feelings. This has in turn helped them realise what zone they are in. They then go to our visual chart and look for ways they can calm down – or remember their choices.
- Before Zones of Regulation, many of our students felt like they couldn’t come back down to calm. This would mean, they would stay at a heightened behaviour for most of the day. This could have an effect on those around them too. The visual poster on display helped give them ideas of how they can calm down. It also showed the students that they can get back to the green zone and how they can self-regulate.
- Our students have a peg with their face on by the Zones of Regulation poster. Through the day, we encourage them to go and check on their zones and if they need to update. Many now do this independently. This lets us know how our students are feeling. It gives us a heads up and allows us to adapt upcoming events/activities that we know may cause a knock on effect.
- We have introduced Zones of Regulation to many of our main stream classes. The children respond well to it there too. They love to look after their friends and check on how they are doing too.
Who can teach the Zones of Regulation?
Anyone! It would definitely be beneficial to go on one of the courses that are provided to learn more about Zones of Regulation, but there are also lots of great resources and books that you can purchase to find out more. You can introduce the Zones at school, home, in therapy etc. We just recommend everyone involved follows the same approach and keeps it consistent to avoid any confusion.
What are some important things to remember?
- First of all, remember that it’s ok for students to be in any of the zones. Never punish them for being in the ‘red zone’ – remind them it’s ok to be in the red zone. Talk about why people may end up in the red zone and what can contribute to this. Then use this as a way to talk more about the causes, what they can do instead, and how they can get back to green. There are no bad feelings!
- Choices. Have posters to show your learners the choices that they can make. You can also show them ideas on how they can get back to the green zone.
- It provides teaching staff the tools to know how the individual is feeling. If your student is in the red zone, whatever you teach them, they may not remember.
- Provide your students with the tools that they need to help themselves get back to the green zone. Then, you can start to withdraw your support. This gives them more independence to help self-regulate.
- Be consistent. You don’t want to confuse anyone, so make sure to be consistent with your Zones of Regulation and how you use them, across all settings.
What do you think about the Zones of Regulation? Do you use the Zones of Regulation? Where – at home? In the classroom? At therapy?
If you like this blog post, please share it with your friends on social media.
